Removing or Deleting Numbers
There are key distinctions between the functions of Removing Numbers from a Pool and Deleting Numbers.
You must also consider the function of Pools and how they relate to the numbers assigned to them.
Numbers that are assigned to a Pool but not yet used:
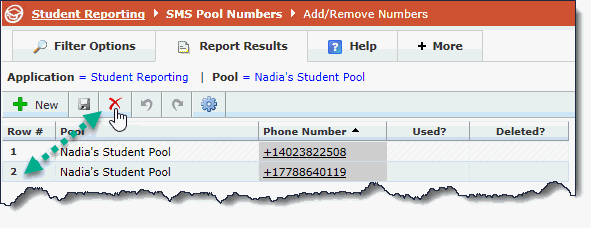
For numbers that have been assigned to a Pool but not yet used, you can easily release them back to the main Available Numbers page to be added to another Pool.
To do this, simply highlight the row (click the Row number, in this case #2) to select it; the data entry toolbar will activate and you can now click the red X to delete the row.
Note that what you're doing here is not "deleting" the number, you're simply removing it from the Pool. Because it is unused (notice the lack of a check mark in the Used? Column), it can be removed and made available again.

Number that are assigned to a Pool and have been used:
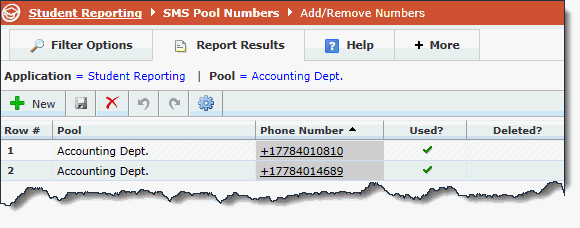
In cases where a number has been assigned to a Pool and has already been used, the same function applies to remove it, however if it's been used it will not be sent back to the Available Numbers form to be used by other Pools. A Number can never be used in two Pools and cannot be re-assigned from Pool to Pool once it has an SMS history attached to it. If the Used? column is filled in, as in this sample below, deleting the number will show as "Deleted" in the final column and when a daily job is run it will be removed from the page entirely. That number can never be used again at your institution.

Deleting a Number that is not assigned to a Pool:
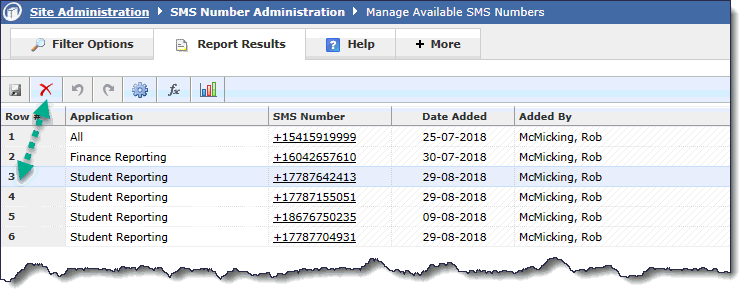
If you run the Available Numbers report, either by Application or at the Site Admin level, you will see a list of numbers that are currently available at your institution to assign to a Pool. Until they are assigned to a Pool, they are listed as Available SMS Numbers and are assigned to either "All" or to a specific FAST application. Numbers assigned to "All" can be picked up by an Administrator in any FAST application.
The numbers on this list represent numbers that your institution owns (bought or was given) but have not yet been selected for a specific Pool. Should you wish to delete one of these numbers (although it is not recommended), simply highlight the Row # by clicking on the number itself; this will highlight the entire row and activate the Delete button on the data entry toolbar directly above the grid.
Click Delete to remove the record, and Save to commit your changes:

Once the number is deleted, it is removed from the page immediately and returned to the original vendor.
