Running Pinned Reports
Once you have saved one or more Pinned Reports, you can review, edit or run those reports at any time, on-demand! There are a few places you can locate your Pinned Reports.
The Pinned Reports Tab
The most common option is the Pinned Reports Tab within the application. Select your Pinned Reports Tab (and be sure to save this as your default tab for quick an easy access next time!).
On your Pinned Reports Tab, you'll be able to review your Pinned Reports by category:
My Favorite Reports: These are the Pinned Reports that you have designated as part of your personal list of "Favorites"; to add reports to this list, locate a Pinned Report in either the Private or Group library and click the Star. To remove reports from this section, you can click the Yellow Favorite star again OR click the Delete button to delete it completely.
Please Note: You can only delete Pinned Reports that you have created or been assigned maintenance access to. If you choose to de-select the report as a "Favorite" it will simply fall back into the original Pinned Reports library it came from but you can still view and retrieve it at a later time.
My Pinned Reports: These are the Pinned Reports that you created and that you have saved as Private. No other users can see, run, edit or delete them.
Group Pinned Reports: This category is divided up by Group Name. All Groups that you belong to will appear on this list. In each list, you can see the Pinned Reports that have been assigned to each group. Depending on the access that has been defined, you may be able to view the reports, view and edit the reports, or you may only see the reports as "read only".
Search: You can use the Search field to key in part of a keyword. Click Search and the list of reports that contain that keyword in the title will be displayed to select from.
From your Pinned Report Tab, here are a few things that you can do:
Execute: Using the Execute Report button, you can quickly and easily RUN your report, using all the saved filter options, sorting and formatting.
Report Name: This is the originating page that the Pinned Report was built on.
More Info: This section will display key information including a pop-up that will display your Report Description (if included), an information button that will display the Pinned Reports stats (such as when it was made, who made it, how many times the report has been run and the last time the report was run), and you may also see a Talking Heads icon that means this report is also being shared with one or more Groups.
PDF: Click this icon to quickly and easily export the report data to PDF format
Excel: Click this icon to quickly and easily export the report data to Excel format
XML: Click this icon to quickly and easily export the report data to XML format
Email: Use the Email button to send the report, as a link, to a colleague. Please Note that security will still be applied to the report when using this option; it is important that the users you send the report TO have the same security settings as you do or they may not be able to open or view the report detail.
Dashboard: If a small Graph icon appears in the Dashboard column, it means this report also exists as a Graph on one or more Dashboards.
Scheduler: If a small Timer icon appears in the Scheduler column, it means this report has also been scheduled using the Report Scheduler. This is also the quickest way to deliver Pinned Report content directly to your in-box!
Favorite: The Star icon can be used to select or de-select Pinned Reports to your personal list of Favorites (for quick and easy access!)
Delete: Use this button to delete the Pinned Report completely. If a Delete button is not available, it means that you do not have Edit access to that report.
Here are some Icons for quick reference:
Execute: 
Description: 
Information: 
Shared/Group: 
PDF: 
Excel: 
XML: 
Dashboard: 
Email: 
Scheduler: 
Favorite: 

Delete: 
From the Main Reporting Menu
Alternatively, you can also access Pinned Reports from the main menu that the report was built (Pinned) on. In this example, on the Admissions report, you can see that one is the Group Pinned Report we created (notice the Group icon) and the other is a Private Pinned Report created from the same reporting page in FAST Student Reporting (notice the Pin, indicating a Private report):
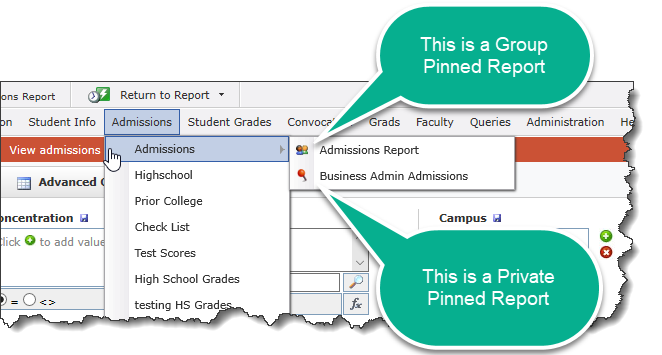
To run (execute) one of these reports, simply click directly on the Pinned Report title and it will execute immediately and bypass the Filter Options Page.
From the Main FAST Home Page
You can also access your Pinned Report content right from the main FAST Home Page (also referred to as Portal Home Page). Here you will be able to toggle between any applications that you have access to and where you may have Pinned Reports to choose from:
This allows you to the same options as are available on the FAST application Pinned Reports Tab.