Creating a custom query with the graphical query builder
|

You can use the graphical query builder as a visual aid when creating custom queries. You can create a new query or edit an existing query. The graphical query builder is designed to create basic queries, more complicated queries may produce an error.
In the Graphical Query Builder, you can select columns from the Objects you want to use, set a sort order, a column alias, and the criteria (where clause). You can also join a column in one object to a column in another object.
There are different types of objects and may start with TBL for tables, VW for views, or SYN for synonyms. It depends on which FAST application you are creating your custom report in, what kind of access you have, and what data your institution uses.
To create a query using the graphical query builder:
On the Queries menu, click Query Builder.
Select the Query List tab and then click
 Create New Query.
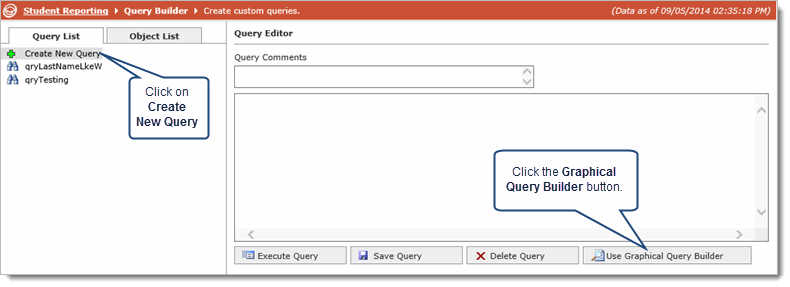
Click Use Graphical Query Builder. On the top left, the list of available objects open.
From the list, click an object. This opens the object to the right of the object list. You can open as many objects as you want.
The list of fields (or columns) for each object opens to the right;
The letter in the small box on the top left is the alias; if you change the letter, the SQL code is updated.
Once you have added your object to the Query, you will need to select the fields within the object to add to the query. For each object, you can:
Select a check box for each column you want in your query.
Clear a check box to remove a column from your query.
Hover over the column name to view table comments and metadata.
The fields are added to the list below the objects (in the middle) and the SQL code is added to the large text box.

If you are using more than one object, you must join them. You do this by joining fields (columns) of the same type from one object to another object.
In the middle section where the list of columns are, you can do the following:
From the Sort list, you can select ASCending or DESCending.
Add an alias for the column.
Add the Where Clause data in the Criteria and Or... columns.
You can change or add SQL Code to the large text box. Click Refresh to update the data in the list of columns above the text box.
If a column in the query is using a function, that column needs to have an alias name. For example, SUM(realamount) AS realamount.
Click Execute Query to list the data. The Query data will display in box below the SQL Code.
Note that the default is for only the first 100 records in the query will be returned. This is to limit the data in cases of large queries to a workable amount in the query builder. Use the results browser to ensure that you are getting the query results that you expect with the correct columns and data, and that there are no errors in the query. The number of results that are returned is a configurable setting. (NOTE: for stability and performance reasons this limit should not be increased past 2500)
To save the query, click Return Query.
Type the Query Name, clear the Private check box if you want everyone to see the query, and then click Save Query.