Adding SMS to Custom Pages
Administrators can add and create SMS functionality and enable the full potential of the Communication Centre on any custom reporting page.
The Phone Number field does not have to exist in the datagrid for the function to be enabled or added, in fact it is not necessary at all and can often hinder accessing the correct information in your Student or HR ERP.
If there is not already a suitable or appropriate column to add the SMS Control to, the best option is just to create a simple Virtual Column before moving to the next step.
Creating a Virtual Column for the SMS Control
To create a Virtual Column, first execute the report and locate the gear button on the toolbar, click Add to create new:
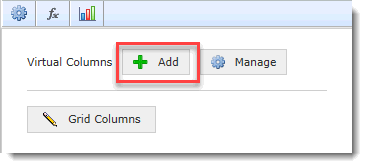
Complete the Virtual Column worksheet, being sure to give your column a suitable name (such as SMS or Mobile) and enabling your column for all end users.
Please Note: Most end users cannot make global or public Virtual Columns; this is reserved as an admin-level function or for specific delegates who have the Virtual Column Admin Role. If you do have this role, it allows you to a) key a formula or text into the formula text box and b) click the Available to all users check box before saving your new column.
To populate your Virtual Column, the data itself has no bearing on the SMS functionality. We suggest you keep it simple and duplicate a column in the dataset (could be name, ID or other) or simply create a column using a letter like 'x'. We will change this once the Hyperlink is added. This is simply an interim measure to create a blank canvas where the SMS control will be placed.
Mark as Available to all users only once you have tested your column.
You're now ready to move on to enable the SMS Control using the Hyperlinks functionality.
To add and enable the SMS Control to Custom Reporting Pages
First locate the custom reporting page, select the +More tab and select Hyperlinks.
Please Note: Not all end users will have access to the Hyperlinks tab; this is generally reserved for application or site level Administrators and/or those tasked with creating custom pages in FAST.
Click the Add Hyperlink button to begin the process:

Next select the Column to add the hyperlink to. We will use the new Virtual Column created in Step 1, called SMS or Mobile.
Click Add to begin.
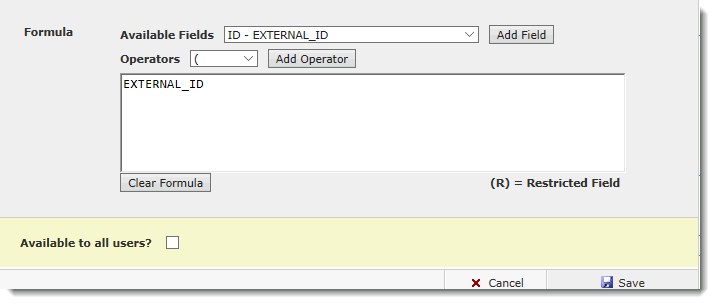
Step 1: Create a Condition
Keep this fairly simple. We would recommend saying Where [field] is [not blank]. In this example, I have used the field of External_ID (ID):

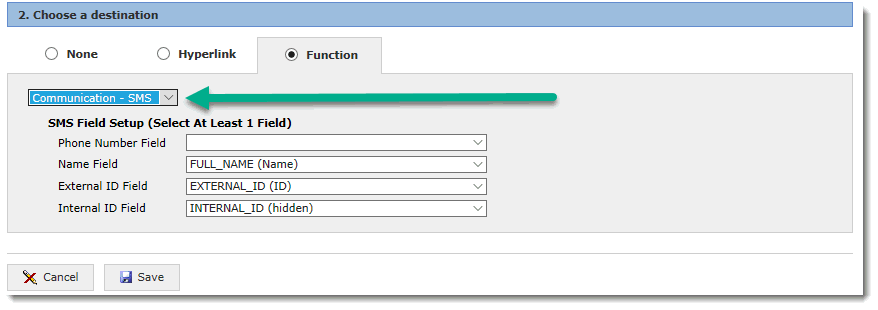
Step 2: Choose a Destination
Select the Radio Button next to Function and from the drop-down list, select Communication - SMS.
For the SMS field setup, select at least one value. We would suggest using the External ID and/or the Internal ID fields:
Click Save to complete.
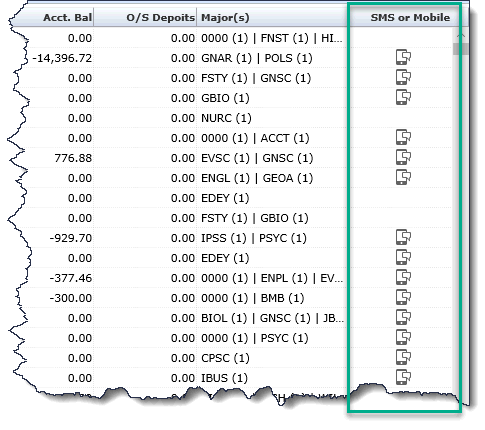
Step 3: Test your new column
To test your new column and the Communication SMS control, re-execute the report, then locate your column on the report results. This column should now contain the SMS icon for each row where the condition has been met and where a mobile number exists for that student or employee in your ERP. Also note that if the student or employee has opted out of SMS communication, the column will be blank.
Using your new SMS Control
You can now use your new SMS control either with an individual record (2-way texting with one student or one employee) or use the full Communication Centre to send an SMS message to entire list of students or employees.
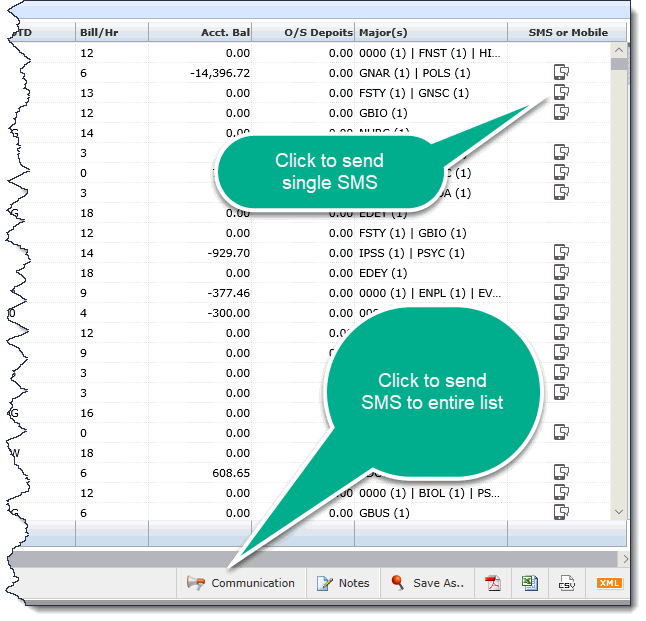
Your SMS control is now ready for use and end users with the correct access to the custom reporting page and to one or more Pools will be able to see and use this function.