Create Table from an Excel File
Administrators and/or IT users can now create client-specific tables in the FAST Oracle database. Under normal circumstances, these tables could then be used to create custom data entry pages.
To locate the Table Builder tools, on the Queries menu, select Table Builder, then Create Table.
he two options available are:
-
Create Table from XL File

To create a table from an Excel file:
-
Create an Excel template to upload; your Excel file may be column headers only or may also include data. You will have the option to include or exclude the data in the report when creating your Table. If you choose to include the data, FAST will attempt to correctly map the data type, however you should still confirm this before saving your table.
-
It should accept either a .XLS or .XLSX document type. If you have any issues, please re-save the template to .XLS format. Under certain older browser conditions, an .XLS format is required.
 You can create a template from scratch by adding column titles, etc. or if you already have a dataset that you intend to upload into FAST from another source in an Excel file, just upload that!
-
Click the Create table from XL File Button
-
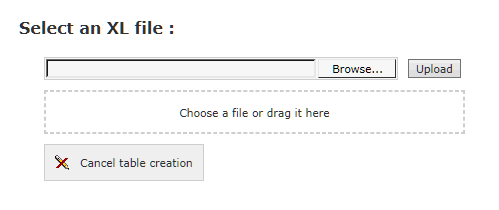
Select an Excel file on your computer or Network drive by either dragging and dropping the file to the space provided or by clicking Browse to locate the file on your computer:

-
Click Upload to upload the file to the Table Builder.
Once your file uploads, you will be brought back to the Create Table form; now it's time to refine the table and ensure all the details are correct.
Please review the Table Builder Criteria file to ensure accuracy when validating your column details.
Once your file is uploaded:
-
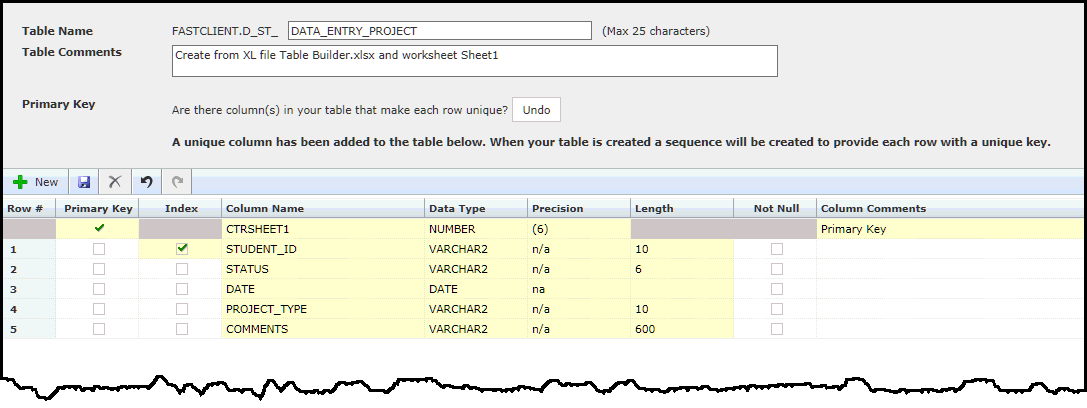
Don't forget to rename your Table Name. The default will display as the Worksheet Title from your Excel upload.
-
You may also wish to refine your Table Comments which will default as "Create from XL file <title>.xls and worksheet <title>"
-
You must also indicate whether or not your Table contains a Primary Key or whether you would like FAST to create one for you. This is a crucial step and if you are unsure, please stop here and contact Customer Support before moving on to the next step. Only one column can be selected as your Primary Key. If FAST creates a Primary Key column for you, this column cannot be deleted.
-
Index: This is optional; you can choose to index one or more columns if these columns will be used as a regular Filter Option on the data entry report. It is recommended to only Index the required columns; adding too many will cause the report to run slowly and could impact the end user experience.
-
You may also need to refine your column Data Types, Precision and Length. When uploading an Excel file, FAST will try to guess the data type, but if no data is available, a default of VARCHAR2 will be selected. You can change this to NUMBER or DATE.
-
Precision: This field applies to Data Types of NUMBER only. This allows you to specify the number of digits that the cell will accept. We have included options to select from; if you need a number format that is not listed, please contact Customer Support so that this can be added as a client rule.
-
Length: This field applies to Data Types of VARCHAR2 only. Key in the desired number of characters.
-
Not Null: Select this option only if end users must populate this field before saving their data entry records. Leaving the indicator unchecked means that end users can leave the cell empty to save.
-
Column Comments: Include up to 4000 characters as internal reference comments; these will not flow through to the data entry report.

Once all mandatory fields have been completed, click Save to review your table details.
Once you have successfully saved your Table, you are ready to Manage your tables or proceed to create a custom data entry page with the table.
