Data Entry Page Builder
High level power users or IT Administrators within the FAST Reporting applications can now create custom data entry reports for such data that is not currently being captured in your baseline ERP.
Please review the section on how to Create Tables to use in the Data Entry Page Builder before moving on to this step.
Under the Queries menu, select Page Builder, then select Create Data Entry Page.
The standard Page Builder Wizard will begin, with a few key exceptions.
-
Enter Page Details including a Page Title, Description and Page Comments (optional). The Page Title and Description will flow through to the final report and be visible tools for your end users; the Page Comments will not be visible to your end users and are intended for internal use only and/or for those Administrators who are tasked with approving the custom reporting pages before they are released.
-
Enter Table: Select a Table; if you have warehoused a table using the Warehouse Builder, this will now be available to you in the drop-down menu:

-
Select a Primary Key - you can build an auto-number into your Table by using the prefix of ctr[tablename]. You can use other coding here if you prefer. Select a Primary Key from the available options.
-
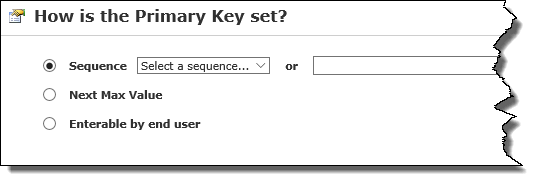
How is the Primary Key Set? Options are: Select a sequence, Next Max Value, Enterable by the end user:
-
Enter a baseline query. The query from your initial table will display here; edit as necessary or click Next to proceed. FAST will execute the query in the background when you click "next" and ensure that your query is valid before moving on to the next step. This is also the step where you should build in and incorporate any additional lookups and formulas that you would like to include; you may type these directly into the box and/or validate them using a sql development tool before moving on.
-
Security: You may choose to apply report level security based on your institution or department's rules, such as Chart, or you may choose "Use None".
-
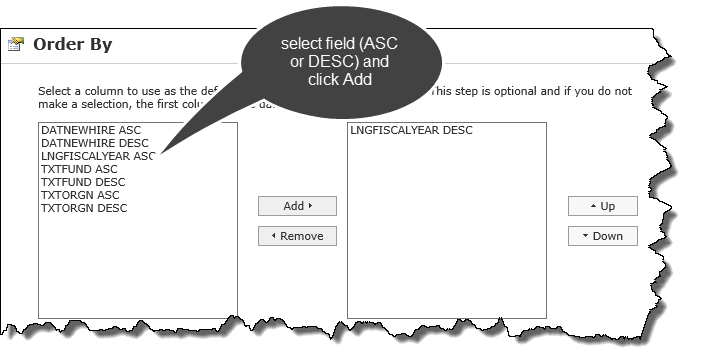
Order By: You may select a default sort order for the column execution for this report. This is an optional step and leaving this grid blank will result in the first column of the dataset representing the default sort order for your end users. Selecting one or more columns as a sort order allows you to build structure and clarity into your report prior to making it available to your end users; end users can always modify the sort order using the Advanced Options.
-
Enter your fields including Filter Types and Datagrid column Types:
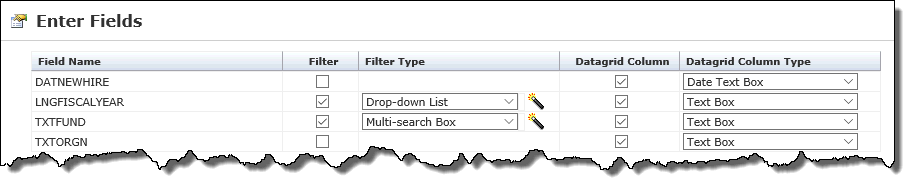
Please Note: For any formula or calculated fields that you have included, or others where you may not wish for end users to be able to edit the cell data, change the datagrid column type to Read-Only using the drop-down option.
You would also want to select Read-Only if you have columns that are being displayed for reporting purposes and that do not get keyed in by the end users for this report.
-
Select your Filter (data) Setup as either a Stored Procedure (recommended where available) or from the main data query. The key difference here will be in the overall performance (speed) of the data being collected and to the processing time of this report.
-
Filter Setup (Properties): You may now modify your Filter Title, Display Order (left to right on the page), Mandatory Indicator, Popup Control Width, etc. Please note that much of the Filter Control and datagrid administration can also be managed at the Page Level.

-
Set up Chart Dependency (Optional and will depend on your institutional configuration); or use none.
-
Set up Index Dependency (Optional and will depend on your institutional configuration); or use none.
-
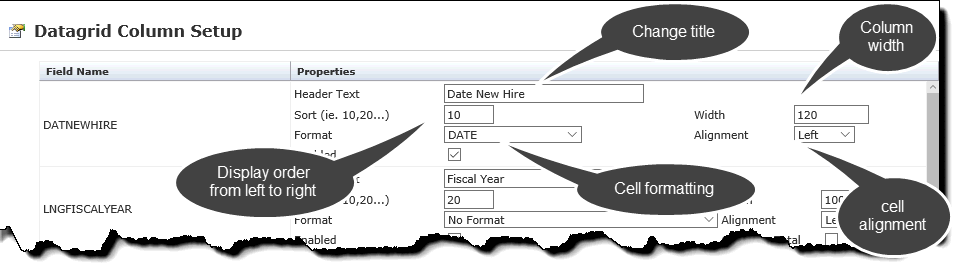
Datagrid Column Setup: Modify the Header Text, Display Order, Format, Width and Alignment of each of your columns in the report datagrid:
-
Data Entry Column Setup: Specify the Max Length (characters) for each of the applicable columns.
-
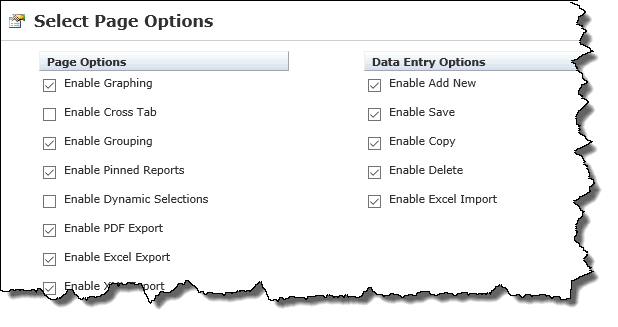
Select Page Options: Enable or disable any of the Advanced Page Options and/or Data Entry Options for this report and data entry grid:
-
Select a menu location (node) and select a Menu item name (title). Please note: these can be modified at a later stage but you must select a name and location before creating your reporting page.
-
Click Create Page to complete the Page Builder Wizard.
-
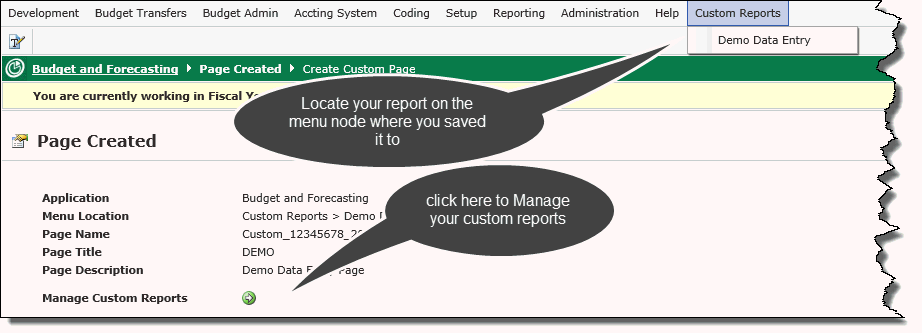
FAST will notify you that the page has been created; you can click Manage Custom Reports or find your report to execute on the menu. Remember that until you approve your custom reporting page and apply grant access to it on the Administration menu, only you can see and run this report.
Once you have saved your report, it is available immediately for review and administration Using the Manage Data Entry Pages form. You will need to approve your report and assign security to it by granting user roles that you wish to be able to see and/or run your report.
Remember that for Data Entry pages, you need to assign security to both the Report (view-only) level as well as to the data entry level. Please review how to assign Roles to Menu Items for more information.
To add additional complexity to your base table, you may use the Graphical Query Builder to edit your Query, but only once the data entry page has been created. This will allow you to join additional objects from the current FAST data warehouse to your existing query/table.