Dynamic Selection Column Level Options
End users can now quickly and easily create a Dynamic Selection from the context menu of any report column header.
Without leaving the Report Results tab, a Dynamic Selection can now be added with two clicks. No additional data entry is required, and the selection will automatically expire and disappear the following day.
Dynamic Selections created this way will be available on all filter option fields without the user needing to specify which field(s) the Dynamic Selection is for.
If the user wants to make the Dynamic Selection permanent, they can also select "Expires: Never" at which point they will need to specify the mapping on which field(s) the Dynamic Selection is for. If a user wishes to share this new selection, they must select an expiration of "Never"; the selection can then be shared and used in Shared (group) Pinned Reports provided that the user has the appropriate security to access the Pinned Report sharing options.
To create an Ad Hoc Dynamic Selection from the Report Results Tab:
Run any baseline FAST report where you would like to capture a 'selection' of records to use against another report
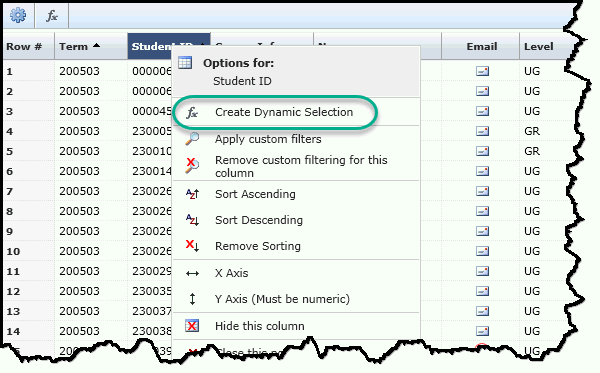
At the column header level, click the title and open the context (column level) menu; select Dynamic Selection from the drop-down options:
The Dynamic Selection dialogue box will pop up:
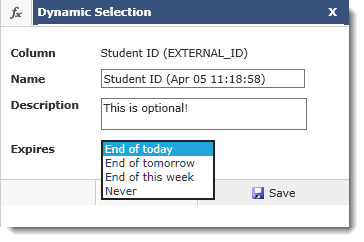
If you want to customize the name/description/expiry date you can do this as well from the dialogue box. The default expiry date is "End of Today". If you do not customize the Name, be sure to make a note of the pre-assigned Name in the text box. You will need this for the next step.
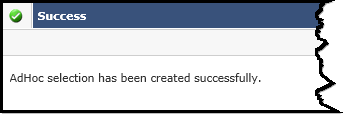
Click Save to create. A message will display indicating that your AdHoc Selection has been created successfully.
You are now ready to run/apply this selection against any other FAST report!
Locate any other FAST Report that you wish to now apply this selection of records against. In other words, you have captured a record set and temporarily saved it; what else do you want to know about that selection of records?
Locate the Filter Option control that you would like to use (notice the function-based filter buttons on each filter control):
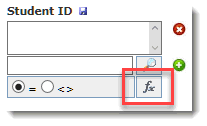
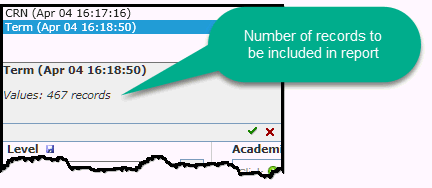
Click the function-based filter button to reveal all current selections available for you to select from. Note: these will display your (private) selections only and cannot be shared with other users. Clicking on any selection will display the description (optional) in the text box as well as a record count for this selection. In other words, if you choose this Dynamic Selection, this displays the count of how many records will be pulled into the query. To choose the current selection, simply click the green check mark or double-click the selection.
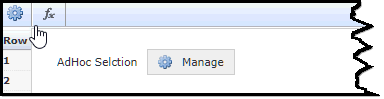
To manage your Ad Hoc selections, click the Function key on the report header bar:
 then select Manage.
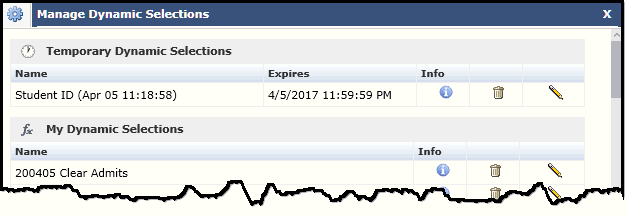
A Manage box will display based on two distinct categories: Temporary Dynamic Selections and My Dynamic Selections. For each line item, you can:
Review the info by hovering your cursor over the Information icon

Delete using the delete icon

Edit using the pencil icon

Note: these private, ad-hoc and auto-expiring Dynamic Selections cannot be used with Pinned Reports.
To Create a Dynamic Selection that can be Shared:
Once you isolate and select the dataset that you wish to save as a Dynamic Selection, select it as you would above in Step 2 by clicking the column-level header to choose "Create Dynamic Selection";
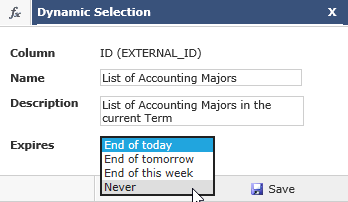
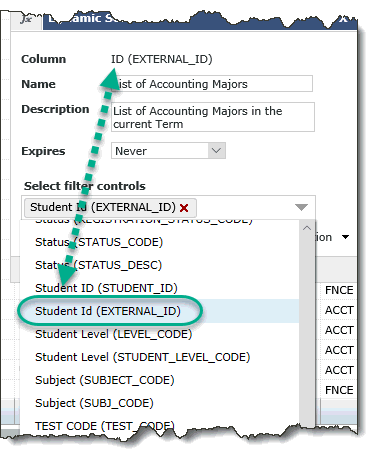
Add a Name and Description and using the drop-down, set the expiration point to "Never":
The next step involves selecting the Filter Control(s) that you wish to map the Selection to. The key is to map the Selection to the Filter Control(s) that the users will be able to locate the Selection in and then run as a Filter in additional FAST Reports. In some cases, more than one choice may seem reasonable and in these cases, you can choose more than one if you are unsure. In this example, the correct mapping of ID (EXTERNAL ID) is Student ID (EXTERNAL_ID). This step will tell FAST which Filter Control(s) to apply the new Selection to, allowing your end users to locate and use it.
Next, provided you have the correct roles for Sharing Dynamic Selections, click the Share button called Share This Selection (Note: if this button is disabled, it means you do not have the correct role(s) to Share Dynamic Selections), which opens the next drop-down. This will allow you to share the saved Dynamic Selection with additional User Groups (you can select one or more than one from the drop-down list).
Click Save to complete.
A Success message will display indicating that the Adhoc Dynamic Selection was created successfully.
For more information or to learn how to Manage your Dynamic Selections, please click here.