Changing the menu layout
You can change the layout of an application menu by moving a menu or menu option to a different location. A menu (root level node) cannot be moved to the location of a menu option (child level node). A menu option cannot be moved to the location of a menu, however, a menu option can be moved below another menu option.
To change the menu layout:
On the Administration menu, select Layout, then Menu Layout.
Select an Application from the drop-down menu provided. This step is only required if you are working within the Site Administration application. At the individual application level, you will ignore Step 2.
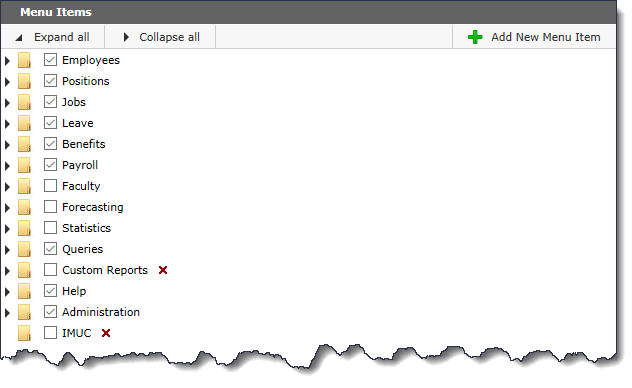
All possible Menu Headers in the application are in the list; if the check box is selected the menu is currently enabled (globally).

Use the check boxes to enable or disable reports within a folder or entire folders (Menus) from the application. Remember that if you assign Menu Access to de-selected menu items, the users will not be able to see them. All changes are saved in real time as you make your selection.
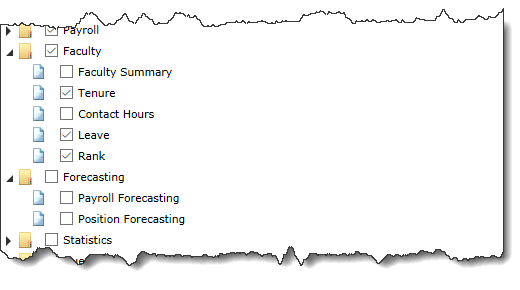
In this example, two reports (Faculty Summary and Contact Hours) are disabled from the Menu called Faculty and the entire Menu called Forecasting is also disabled meaning no users can see them:

You can drag a menu to a different location. The name and dotted line indicates where you are moving it to.
Expand a menu to list the menu options by clicking the arrow.
You can also add a new Menu Item if you wish. This is often used to house institution-specific custom queries or other custom menu headers. To create a new Menu, select the Add New Menu Item button and when prompted, give the new menu a title. You can then re-arrange the display to include your new menu item wherever you would like it to appear.

