Creating a Pinned Report
Once you've generated a report that is meaningful, you may have report data that you need to run and review on a regular basis. Rather than re-creating that report every time, the best option is to create a Pinned Report once, so you can save it for future use! Having your pinned reports and graphs readily available can reduce the amount of time spent recreating them and also make them much easier to access.
Pinned Reports can also be created and assigned to specific Groups on campus, or can be assigned to the "All Users" Role within your application. The creation and management of Group Roles will be explained in another section. This is an administrative function and may not be available to all users.
To save your report as a Pinned Report:
If you haven't done so already, create your report. Remember you can customize your Filter Options, the look and feel of the report datagrid (output), and use the Advanced Options to further refine the display and layout of your report structure. This can be completely customized to meet your needs as an end-user.
Don't forget to consider using Dynamic Filters if you would like to run this report on an ongoing basis without the need to make changes.
At the bottom of the page, on the right hand corner, you will see a Pinned Reports Icon. If this is the first time saving this report, it will be labelled "Save As":
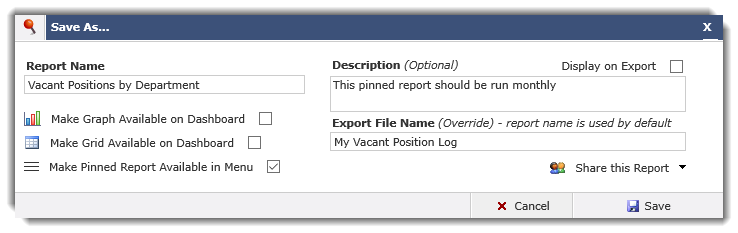
A Save as Dialogue Box will open and provide you with the following options:
-
-
Report Name: Type in a new Title for your Pinned Report
-
Description (optional): Type in a description that will add context to your Pinned Report
-
Display on Export (optional): Use this check box if you would like the description to be included if/when your Pinned Report is exported
-
Export File Name (optional): Use this field if you would like the exported file name to be different than your Report Name in option 1. Please note that the system will automatically add underscores between words and that your name cannot contain any of the following special character: \/:*?"<>|
-
Make Graph Available on Dashboard: Use this check box if you have also graphed your Pinned Report and would like to now use it on your Dashboard
-
Make Grid Available on Dashboard: Use this check box if you would like the datagrid to be saved as a Grid and made available on your Dashboard
-
Make Pinned Report Available in Menu: Use this check box if you would like to be able to access your Pinned Report from the main drop-down menus in addition to your Pinned Reports Tab.
-
Share this Report: This option will only be available if a) you have the correct roles/permissions to share Pinned Reports with others and b) there are no private Virtual Columns or Dynamic Selections that form part of the report, thus making it unavailable for sharing.
-
If the Share option is available, you can click the arrow to view the options:
-
-
Users in these groups can run this report: By assigning users to this option, the members of the group(s) assigned will be able to view and run the Pinned Report. It will be saved on the Pinned Reports Tab under the category of the Group(s). The only groups that will display in the drop-down are those that currently have Menu Access assigned to the report you're saving.
-
Users in these groups who are also in the "Create/Update Group Pinned Reports" role can run and maintain this report: If you assign a group the ability to run and maintain the Pinned Report and one or more users in that group have the role called “Create/Update Group Pinned Reports”, those users will also be able to maintain, modify and/or delete the Pinned Report as though they had created it. It is important to note that users who have the "Create/Update Group Pinned Reports" role can only create and update Group Pinned Reports for groups that they belong to; this does not necessarily mean for every Group.
-
Users in these groups can run this report but won't be able to change any filters or options: This is a Read-Only assignment and provides very limited access that allows users to view the Pinned Report without being able to modify the base filter options, advanced options, change or add column filters, etc. They can see the report exactly as you've saved it, but that's it! Only the groups that do not have Menu Access to the report will appear in the Read Only sharing list.
-
To review a list of the users in each group you've selected, click the View Users button to the right of the drop-down list.
Once you've made your selection, click Save to complete.
NOTE: Once you have saved a Pinned Report to one or more groups, it is no longer considered "your" (Private) Pinned Report, even though you created it. It will now display on the Pinned Reports Tab under the Group Name(s) you have associated with it.
There are several places where you can locate and execute your Pinned Reports from; review the help topic of Running Pinned Reports or Editing Pinned Reports for more detail.