Manage Data Entry Pages
To manage any of your current custom Data Entry Pages once they have been created, from any FAST Application, select the Queries menu, select Page Builder, then select Manage Data Entry Pages.
Please note that the Data Entry Pages are managed separately from your non-data entry custom reports.
This page is used to manage or edit all aspects of your custom data entry pages once they have been created.
The Page Options Include:
-
Menu Path: This is the path or menu structure associated with where this report currently resides on your Main Menu.
-
Page Title: This field is also hyperlinked, allowing you to quickly access the Data Entry page from the page
-
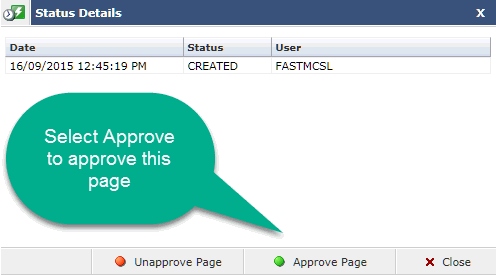
Status: The report may relate to one of three status codes: Created (needs approval), Approved or Unapproved. To change the current status of the report, click on the colour-coded Status bubble and select a new option. This feature may be role-based, depending on your configuration. For a new Custom Data Entry Page, it may look something like this:
These status codes are outlined in the legend at the bottom of the page:

-
Details: This is a read-only display that covers the details of the current data entry page and includes elements from the Data Entry Page Builder, the Query and any updates.
-
Executions: This hyperlink relates to the number of times this data entry page has been executed by your end users. Clicking on the number will expand to show you which end users have run the report, how many times and the last execution. This is a great way to keep track of how useful the new report has been.
-
Hyperlinks: This column will be blank if there are no custom hyperlinks built into the report and will have a green check mark if custom hyperlinks have been added.
-
Restricted: This column will be blank if no columns have been restricted and will have a green check mark if one or more columns have been restricted.
-
Edit: Click on the Edit Pencil to review all details from the Data Entry Page Builder wizard. Selecting the Pencil Icon will open the Edit Report Details page, allowing you to select any step of the Wizard as your starting point:

-
Delete: This red X will only appear if you have the correct roles to delete this Custom Data Entry Page.