Sending as Email Only
In some cases, you may not have SMS enabled on all reporting pages and/or in some cases you may simply wish to use Email as your preferred communication type.
Sending a Group Email to all in the Report
Once the report has been run, click the Communication button in the bottom right corner of your screen. Select the Email option to generate an email template. By default, the email will be sent to all users on the reporting page who have an associated email address in FAST. The number of recipients appears in the bottom-right corner of the email template. Complete some or all of the following data fields:
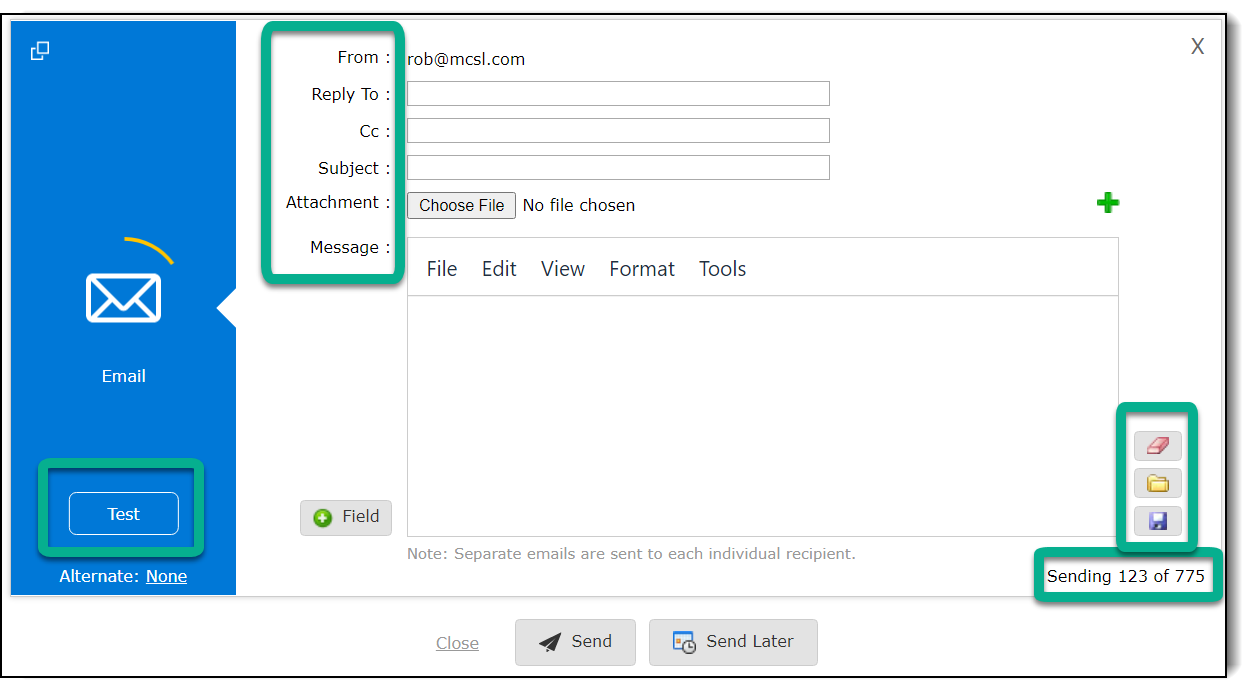
From: This is pre-defined and is your default email based on your User Profile
Reply To: This is an optional field that can be included for users to "reply to"; this is not enabled at every institution and is managed at the admin level using Configuration Setting #5103
Cc: This is an optional field allowing you to copy additional users that are not also part of the original dataset
Subject: Write the subject or title of your email here
Attachment: Click Browse to include one or more attachments to your email
Message: Type the body of your email here
Use the Field key to include report variables to populate your Email.
The Clear Message icon
![]() will clear any message in the message field
will clear any message in the message field
The Load Message icon
![]() will allow you to load any saved templates
you would like to use again
will allow you to load any saved templates
you would like to use again
The Save Message icon
 will allow you to save an email message as a template for later use
The Send button will send the email to recipients immediately.
The Send Later button will allow users to schedule a future date and time to send the email.
Sending E-mail to one recipient only
On some FAST reports, you may wish to simply send a single email to a single recipient. Where available, a single line in the report may have an Email icon displayed.
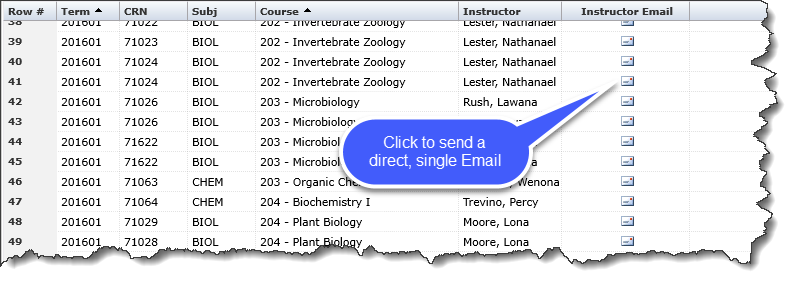
If available, simply select the recipient, click the Email icon from the Email column and the Communication Centre control will open, allowing you to continue with the desired fields, as above. The only email sent will be the one to the targeted employee or student. Rather than a record count on the Email control, you will see (shown below) the name of the recipient for this email.
If you wish, you can still enter a Cc line to add additional recipient(s) to the email and a "Reply to" address if you would prefer that replies be sent to an email other than the one you are sending from.
As always, you can also choose to include report values and attachments before sending your email.
Using the Test E-mail Function
If you would like to test sending an email communication either to an individual or using the Email All or global Communication options, you can do this by configuring the email and clicking on the "Test" button. This will send a draft of the email to the email address of the logged in user so they can review before sending to the recipient(s).