Using the Data Entry Grid Pages
What is a Data Entry Page?
The data entry pages work very much like Excel sheets. You don’t have to click an edit button on a line, then save the line, then edit the next line, etc.; you can click your cursor into any cell in the grid to make that field editable. You can edit multiple lines and save all your changes at once when you’re done.
Data Entry pages can be used in virtually every FAST application and can also be custom-built using the Data Entry Page Builder. This is an advanced feature and is generally only available to application administrators.
To determine if a page is a data entry page, look for the ribbon at the top of the grid:

What changed?
On an older data entry page, you’d have to edit each line individually by clicking a pencil icon to switch the line into edit mode, then clicking the save/disk icon to save that line. On these older pages, anyone who had menu security access to the page would see all the columns on the page, including the column with the edit icons (edit, delete, save, cancel, etc). This means you could not give users read-only access to the page. If they could see the page in the menu, they could edit any line on the page.
There is also a new and enhanced security model that allows administrators to define whether the access to a Data Entry Page is read-only or Read/Write (update access). For more information on how to modify or control the security for these pages, please review the Adding Roles to Menu page to learn about Menu Access.
To use the Data Entry Grid pages:
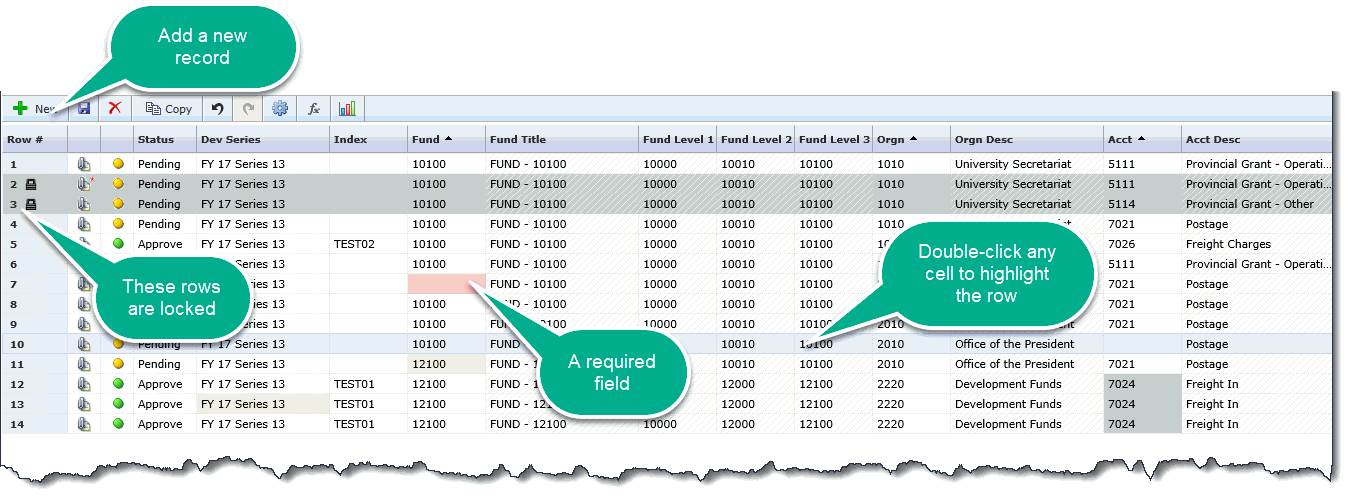
To begin and open a blank row, click + New = Add Item. Or to simply make an edit on the page, click in any cell to begin editing.
The grid will now open and behaves much like a MS Excel document in terms of look, feel and functionality. The required fields (that must be filled in prior to saving your row) will be highlighted in PINK.
To add data to any cell:
Type in any cell to begin; you may use your Tab key to move between cells or your Shift + TAB to reverse.
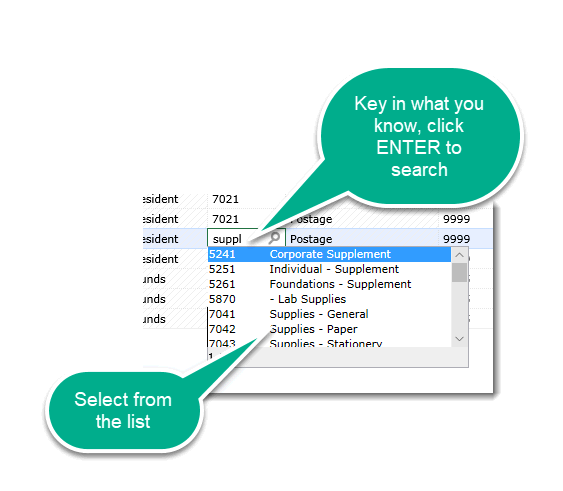
There may be one of two types of Search options in each cell: a Search Box and/or a Drop-down selection. If you know exactly what you need to enter, simply key it in and TAB to the next cell.
To use the Search Box, type in any known portion in alpha or numeric formats in the Search field then hit the ENTER key on your keyboard OR click the magnifying glass on the Search control. E.G. To search for an account that contains the word Supply or Supplies, simply key in part of the word Supply and click ENTER. A selection that meets the criteria entered will appear in a drop-down menu to choose from. You can use your mouse or your arrow keys to make your selection.
To use the drop-down box, clicking into the cell will open the drop-down list, you can make your selection from the available options:
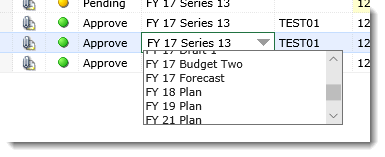
Type or select the value and press TAB. If the entry is not valid, the cell will turn orange and you will need to type a different value. You will not be able to save invalid values and these are all validated in real-time.
To save the line item, click Save; to simply keep working, click the TAB key to continue to the next row. The following will occur:
The first row displays a line number.
Your cursor will automatically open the next row and display the required fields in PINK.
The Toolbar (data entry ribbon) can help navigate your workflow:
The save icon will save all changes since your last point of save. If you leave the page before saving your work, the changes will be discarded.
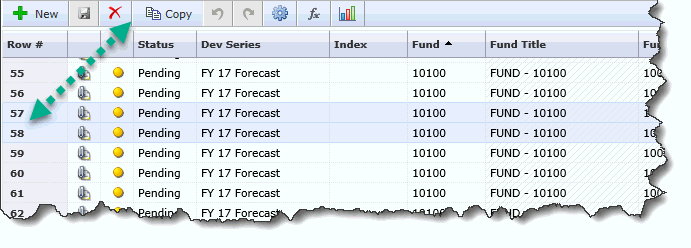
The delete button will allow you to delete an entire row if you select the Row # to highlight the entire row you wish to delete. Once you select the Row #, the entire row will display in a pale blue, indicating that it is selected. To highlight/delete more than one row at a time, select the first row, hold down your Ctrl Key to select additional rows. You can then delete all highlighted rows. For more information on how to select, isolate and delete one or more rows, please Click Here.
In the same way, to use the copy function, you can highlight an entire row, select Copy and then save your changes; this will create a duplicate of the copied row.
If you make an error, you can use the undo and/or re-do buttons to undo your last change and the re-do edit to add it back.
Importing Data From Excel
You can also import data from an Excel File to your data entry page, provided this feature is enabled at your institution.
Related topics: